This is a copy of a post I did when I first started bloggin, several people have emailed me asking how I did my soaps so I thought I would repost it here on my painting blog...
Posted Jan. 6, 2009
Since the Holidays have passed I know a lot of you are looking for something new to craft, Here are the directions for the way I do my soaps...in case anyone else is interested too. This is a recipe that a friend on anotherboard gave me, she said her mother gave it to her. Thanks Linda....These make such cute and personal gifts. I have used pictures of my family and friends also used items I had painted, by printing them out and using them.

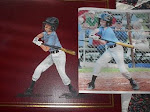
This is a picture of the Seniors on My Grandson's Baseball team last year. I made each one of them a soap for their little happy and remembence of the team.

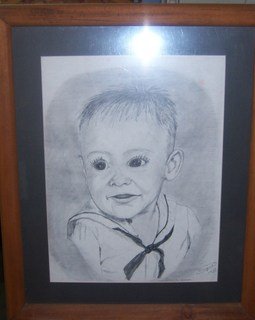
The second one is Keifer and his Dad 18 yrs ago. Keifer gave it to his dad for Father's Day this year.

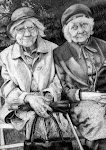
Morgan gave these to her teachers as end of year gifts

This is a print of my art work

Sample of the handpainted soaps
Frist....DO NOT.... use Ivory soap. It has too much lotion in it andis too soft. Just won't last, (I learned the hard way).. I only use Pure and Natural. I use canning wax on the soaps. Clean the bar with alcohol, then dip the tops, in about 1/4 in. deep hot wax. I use an old shallow skillet for this--something with low sides, and use a pair of tongs to hold the soap.when the wax is set, in about 5-6 hours (dries sooner but it is recommended to let wax sit that long), add coat of Modge Podge, then add your decal or picture let dry, another coat of Modge Podge, and finish with another coat of wax. If using a picture that you print on your printer it is recommended that you spray with a clear sealer and let dry for 3-4 hrs or over night or the modge podge will cause the ink to bleed. I would print out my pictures, spray them and then do my dipping that way they are ready at the same time. Be sure to size your print to the size of the soap bar before printing. I also do my handpainted this way... follow the same steps as if you were going to add prints, but after adding modge podge and letting it dry good, you can start painting on your design, may take a couple of coats of paint, let dry between each coat. I usually paint a solid base coat over whole top of soap then paint design on that....when paint is totally dry coat with modge podge again. Let dry then dip in wax, BUT do not let it stay in wax too long and do not dip more than once or your paint might just melt off. I usually dip about 12 bars at a time, that way when I need a gift in a hurry I have the prep work done and all I have to do is add art work.Get the wax at the grocery store. I find it on the isle with the candymaking supplies. Or with the canning supplies.There is a method of painting soap that doesn't call for wax. I have justcleaned the soaps good with alcohol and sealed it with clear spray sealer and then paint your design, when dry, seal again with clear sealer.The wax and modge podge makes it easier to use if you wanted to.... and protects the paint better. Place in clear bag and tie with ribbon or string, add gift tag with instuctions on how to use. Soap is usable if used from the bottom up. Do not leave setting in water. Wet and rub soap on rag. Decal will last till soap is gone.


I always wondered how that was done! Thanks for enlightening me!
ReplyDeleteWOW! you do WONDERFUL work! :) found you through Penniwig's blog and GLAD i did! :) i am going to check out the rest of your blog now! Thanks soo much for sharing! Have a FANTASTIC day!
ReplyDeleteThat's amazing, Molly! I too had wondered how it was done. I think I'll leave it to the expert painters such as yerself! Love yer Western designs!!!
ReplyDeleteMolly, This is just wonderful. I can't wait to try my hand at this..thanks so much for the instructions. I came here from your other blog and I'm so proud that I did...I just love your work..and will mark this on my favorites.
ReplyDelete